LED Interior lights
This is my first big electrical project. This project included making my own wire harnesses, soldering and running a lot of wire. Before this, I installed LED lights on my roof rack (Roof Light Project), but the wiring for those lights ran to my sPOD. Because of sPOD there wasn't a lot of thinking on my part (which doesn't happen much anyway). That lighting project was not as labor intensive and time consuming as this project was.
My goals with this project:
There have been several times I've be on the road or trail at night and need to find something. In order to do that, I'd have to turn on my white lights and blind myself. I would try and find what I needed and hope I don't hit anything to big.
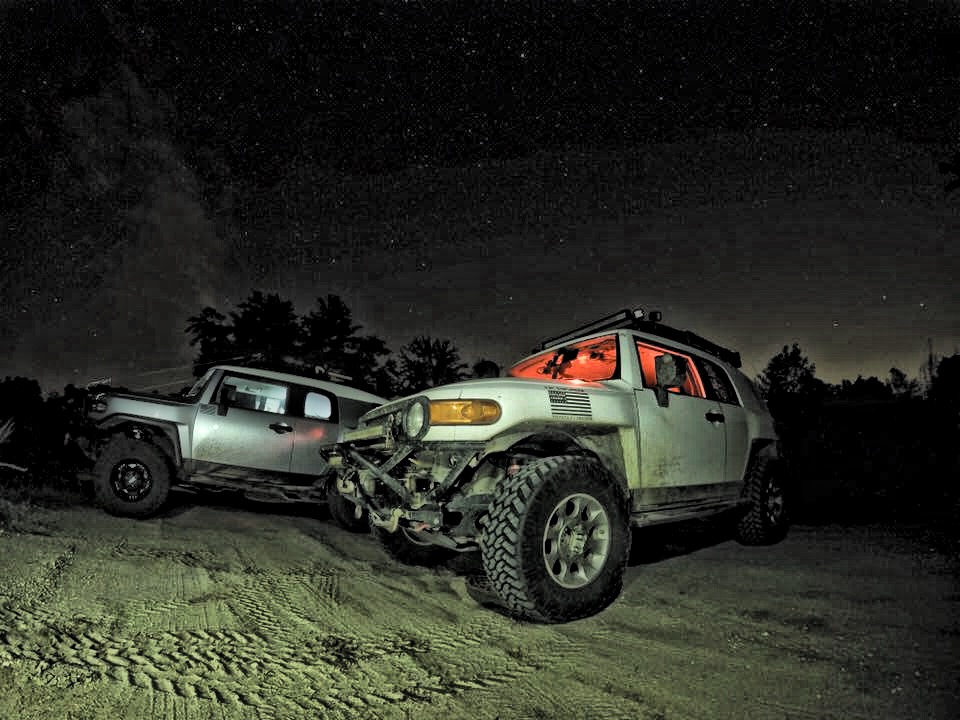
I decided to go with red light. In my opinion it easier on the eyes while still being beneficial...pulse it looks awesome!
I wanted light on the factory switch panel under the radio face plate, the rear storage compartment between the seats on the center console, driver and passenger floorboards and doors.
Once I decided where I wanted the lights, I went to Pep Boys to peruse their LED selection. I bought 15 individual LEDs (4 packs of 3), 4 six LED strips (2 packs of 2) and 2 eighteen LED strips (1 pack of 2).
My goals with this project:
- Add additional interior lighting that would not affect my night driving
- Do a clean and profestional install
- Keep this project as cheap as possible
- ...Don't burn the FJ to the ground
There have been several times I've be on the road or trail at night and need to find something. In order to do that, I'd have to turn on my white lights and blind myself. I would try and find what I needed and hope I don't hit anything to big.
I decided to go with red light. In my opinion it easier on the eyes while still being beneficial...pulse it looks awesome!
I wanted light on the factory switch panel under the radio face plate, the rear storage compartment between the seats on the center console, driver and passenger floorboards and doors.
Once I decided where I wanted the lights, I went to Pep Boys to peruse their LED selection. I bought 15 individual LEDs (4 packs of 3), 4 six LED strips (2 packs of 2) and 2 eighteen LED strips (1 pack of 2).


Before removing anything from the FJ, I decided to do a light test at night. The LED strips come with a "TEST" battery pack to see how bright they are. The individual LED's did not come with that so I used a "123" battery to test them.
For this test, I held them or taped them in place and turned them on. Once I got an idea of how much light they'd put out, I had to decide how I wanted to wire them.
I decided to control them using a on/off switch. Some people will wire them directly into the fuse box. By doing that, the lights come on when the vehicle does which is fine if that's what you want. I wanted the ability to turn them on and off. In my opinion, wiring them with a toggle switch is more work then running a "hot wire" to the fuse box, but to me, it's worth the extra work.
After figuring out I wanted them on a switch, I decided to wire my higher lights (doors) to one switch and my lower lights (floorboard and center console) to another switch. I decided to separate the two because the higher lights might affect my night vision more than the lower lights. The lower lights are more functional than the higher lights anyway.
When all my testes were done, I decided to start the installation on the doors. I started with the passenger door and removed the door panels for the install.
* To see a "How-To" on removing the door panels, please click here: Door Panel Removal


Before doing the LED install on the door panel, I had to figure out how I wanted to run the wires through the body and into the door.
My goals for the wiring were:
I knew easy removal of the door panel later on was important. The factory wiring is all "quick disconnect" and ran through the rubber boot in the door jam. Running the new LED wire through the rubber boot was the best way to go.
For this, I used about 3 feet of wire (ground and positive) that had a male quick disconnect on it. The other side of the wires were open (no conections). Once I built a wire harness for the door lights later on, I would simply connect the wires inside the cabin.
Before running the wire, I decided to remove the door speaker. It wasn't in the way, but I had drank a lot of coffee and knew I might get over excited and sink a tool through the soft speaker.
In order to run the new wire through the factory rubber boot, I decided to remove it. I knew "fishing" the wire through the boot while it was connected might be difficult so I removed the 2 bolts holding the rubber boot against the door. After that, I pulled the rubber boot out of the body panel. Once the rubber boot was disconnected, "fishing" the wire through was very simple. I used a long zip tie to "fish" the wire through. Once I pulled the wire through the rubber boot, I fed it through the plastic housing on the body and into the cabin. Once the wire was ran, I reconnected the boot.
*Note: You might need to remove some of the weather striping around the door to get better access to the rubber boot. I did not do this on the passenger door, but I did on the drivers door. It seemed easier to work with and to run the wire by removing some of the weather stripping.
If you do remove some of the weather stripping, simply pull and it will come loose. To reattach it, I removed the pink clip and put it inside the hole on the weather stripping. Once that was done, I put the bottom of the pink clip back into the door. I found that was easier than trying to put the weather strip back on while the pink clip was still attached to the door.
My goals for the wiring were:
- Easy removal of the door panel later on
- Quick disconnect plug for the LED lights
- Prevent LED wires from getting pinched in the door and keep it water tight
- Keep all wires out of sight
I knew easy removal of the door panel later on was important. The factory wiring is all "quick disconnect" and ran through the rubber boot in the door jam. Running the new LED wire through the rubber boot was the best way to go.
For this, I used about 3 feet of wire (ground and positive) that had a male quick disconnect on it. The other side of the wires were open (no conections). Once I built a wire harness for the door lights later on, I would simply connect the wires inside the cabin.
Before running the wire, I decided to remove the door speaker. It wasn't in the way, but I had drank a lot of coffee and knew I might get over excited and sink a tool through the soft speaker.
In order to run the new wire through the factory rubber boot, I decided to remove it. I knew "fishing" the wire through the boot while it was connected might be difficult so I removed the 2 bolts holding the rubber boot against the door. After that, I pulled the rubber boot out of the body panel. Once the rubber boot was disconnected, "fishing" the wire through was very simple. I used a long zip tie to "fish" the wire through. Once I pulled the wire through the rubber boot, I fed it through the plastic housing on the body and into the cabin. Once the wire was ran, I reconnected the boot.
*Note: You might need to remove some of the weather striping around the door to get better access to the rubber boot. I did not do this on the passenger door, but I did on the drivers door. It seemed easier to work with and to run the wire by removing some of the weather stripping.
If you do remove some of the weather stripping, simply pull and it will come loose. To reattach it, I removed the pink clip and put it inside the hole on the weather stripping. Once that was done, I put the bottom of the pink clip back into the door. I found that was easier than trying to put the weather strip back on while the pink clip was still attached to the door.


Once I ran the wire from the door into the cabin, I moved on to installing the LED's in the door panel.
My goals for this were:
Before doing this project, I noticed a rattle coming from behind the plastic color match insert on the door panel. The rattle or vibration was happening when I had my music up loud (bumping Eazy E). Before doing the LED install I removed the plastic panel and lined the back of it with drawer liner and held it in place with double sided tape and placed it back on the door panel (I did the same for the driver door panel). Once that was finished, I started on the LED install.
I measured and marked where I wanted all the individual LED's and the LED strip at the bottom. I drilled holes for the individual LED lights and the wire for the LED strip. I made the mistake of reattaching that plastic panel before drilling the holes. One time the drill slipped and hit the panel, scratching it. When I did the drivers door, I removed that panel and left it off till after the LED's were installed.
I decided to run a main "hot" and "ground" wire along the inside of the door panel. I ran the wires to the last LED in line and soldered it to the main wires. From there each LED and the LED strip after that would tie into the main wires at one point, verses tying in at several different points. I figured this would be the easiest and cleanest way to do the wiring. Also, by having them all tie in at one spot, trouble shooting would be easier if I had any issues.
Before connecting anything, I ran heat shrink down the main wire. Once I decided where I wanted all the "hot" wires to tie in, I striped the main "hot" wire and ran each wire to that location. Once all the wires were ran, I cut the excess wire, stripped the ends and tied them into the main. From there I soldered everything together to ensure a good connection. When I was done soldering, I tugged on the connections to make sure they were good and used heat shrink to cover them. All of the "ground" wires were done the same way.
Once everything was connected, I ran a test to make sure all of the lights worked using a drill battery. When the test was complete, I used several adhesive backed mounting bases and zip ties to secure all of the wiring to the door panel. From there I took the door panel out to the FJ and loosely mounted it on the door. I wanted to measure how much wire was needed from the connector on the door panel to the connector on the door. Once that measurement was done, I cut the main "hot" and "ground" to the appropriate length. Before connected the female quick disconnect, I ran heat shrink down the wire and then soldered the connection together.
The drivers door was done the same way, but took less time to complete.
My goals for this were:
- Do a clean install
- Quick disconnect of main LED wire harness
- Keep the wires out of sight
- Secure wires and prevent them from "dangling" everywhere
- Keep the wires as organized as possible to make any maintenance in the future easier
Before doing this project, I noticed a rattle coming from behind the plastic color match insert on the door panel. The rattle or vibration was happening when I had my music up loud (bumping Eazy E). Before doing the LED install I removed the plastic panel and lined the back of it with drawer liner and held it in place with double sided tape and placed it back on the door panel (I did the same for the driver door panel). Once that was finished, I started on the LED install.
I measured and marked where I wanted all the individual LED's and the LED strip at the bottom. I drilled holes for the individual LED lights and the wire for the LED strip. I made the mistake of reattaching that plastic panel before drilling the holes. One time the drill slipped and hit the panel, scratching it. When I did the drivers door, I removed that panel and left it off till after the LED's were installed.
I decided to run a main "hot" and "ground" wire along the inside of the door panel. I ran the wires to the last LED in line and soldered it to the main wires. From there each LED and the LED strip after that would tie into the main wires at one point, verses tying in at several different points. I figured this would be the easiest and cleanest way to do the wiring. Also, by having them all tie in at one spot, trouble shooting would be easier if I had any issues.
Before connecting anything, I ran heat shrink down the main wire. Once I decided where I wanted all the "hot" wires to tie in, I striped the main "hot" wire and ran each wire to that location. Once all the wires were ran, I cut the excess wire, stripped the ends and tied them into the main. From there I soldered everything together to ensure a good connection. When I was done soldering, I tugged on the connections to make sure they were good and used heat shrink to cover them. All of the "ground" wires were done the same way.
Once everything was connected, I ran a test to make sure all of the lights worked using a drill battery. When the test was complete, I used several adhesive backed mounting bases and zip ties to secure all of the wiring to the door panel. From there I took the door panel out to the FJ and loosely mounted it on the door. I wanted to measure how much wire was needed from the connector on the door panel to the connector on the door. Once that measurement was done, I cut the main "hot" and "ground" to the appropriate length. Before connected the female quick disconnect, I ran heat shrink down the wire and then soldered the connection together.
The drivers door was done the same way, but took less time to complete.


Once the door lights were installed and worked and the door panels were back on, the next step was making a wire harness with on/off switch.
My goal for this was:
The first thing to do was figuring out what type of switch I wanted and where I wanted it mounted. I decided to use a push button switch with an adhesive backing. I wanted it mounted on the top of the steering column. I figured by mounting the switch there, I could easily turn them on and off while still having control of the steering wheel.
Next I measured the length between the doors and then from under the dashboard to the engine bay. From there I began making the wire harness. Once the harness was made, I did a test to make sure it worked. For this test I used 2 LED strips and the "TEST" battery pack it came with. Once the test was done, I installed the wire harness into the FJ and connected the ends to the door wires. Once the wire harness was ran and connected, I used wire loom to protect everything.
My goal for this was:
- Not have a lot of excess wire
The first thing to do was figuring out what type of switch I wanted and where I wanted it mounted. I decided to use a push button switch with an adhesive backing. I wanted it mounted on the top of the steering column. I figured by mounting the switch there, I could easily turn them on and off while still having control of the steering wheel.
Next I measured the length between the doors and then from under the dashboard to the engine bay. From there I began making the wire harness. Once the harness was made, I did a test to make sure it worked. For this test I used 2 LED strips and the "TEST" battery pack it came with. Once the test was done, I installed the wire harness into the FJ and connected the ends to the door wires. Once the wire harness was ran and connected, I used wire loom to protect everything.


Once the door lights were installed and working, I moved on to the floorboard and center console lights.
My goals for this were:
The first thing I did was figure out how and where I wanted to run the wire harness for the lights. Once I somewhat figured that out, I removed the center console.
Once it was removed, I measured out how much wire would be needed. Again I ran a main "hot" and "ground" from the inside of the center console (under the radio) to the rear of the center console (storage compartment). These wires would be ran under the center console and be used as a removable extension. From here I figured it would be best to use quick disconnects from the main wire harness (which would be located under the radio) and the LED lights (storage compartment). I decided to do that so I could still remove the center console later on if I needed without having to cut the wires for the LED lights.
I decided to install 2 LED lights on the inside of the rear storage compartment that sits between the driver and passenger seats. I drilled 2 holes on the inside of the storage compartment and mounted the lights. Once the lights were mounted, I tested them using one of the "TEST" battery packs I still had. Once the test was complete I brought the wires together and added 1 male quick discount for both lights. I added 1 female quick disconnect on both ends of the main "hot" and "ground" wire being used for the center console.
Once everything was connected, I used wire loom to protect the main "hot" and "ground" wires. I used adhesive backed mounting bases and zip ties to secure the LED lighting wire to the inside of the center console.
My goals for this were:
- Not have a lot of excess wire
- Use quick disconnects on all the lights to make any maintenance in the future easier
- Be able to disconnect LED wires and remove center console in the future
- Be able to disconnect LED wires and remove radio face plate in the future
- Keep all wires hidden
The first thing I did was figure out how and where I wanted to run the wire harness for the lights. Once I somewhat figured that out, I removed the center console.
Once it was removed, I measured out how much wire would be needed. Again I ran a main "hot" and "ground" from the inside of the center console (under the radio) to the rear of the center console (storage compartment). These wires would be ran under the center console and be used as a removable extension. From here I figured it would be best to use quick disconnects from the main wire harness (which would be located under the radio) and the LED lights (storage compartment). I decided to do that so I could still remove the center console later on if I needed without having to cut the wires for the LED lights.
I decided to install 2 LED lights on the inside of the rear storage compartment that sits between the driver and passenger seats. I drilled 2 holes on the inside of the storage compartment and mounted the lights. Once the lights were mounted, I tested them using one of the "TEST" battery packs I still had. Once the test was complete I brought the wires together and added 1 male quick discount for both lights. I added 1 female quick disconnect on both ends of the main "hot" and "ground" wire being used for the center console.
Once everything was connected, I used wire loom to protect the main "hot" and "ground" wires. I used adhesive backed mounting bases and zip ties to secure the LED lighting wire to the inside of the center console.


Once the center console was wired and tested I moved on to the radio face plate. I would be installing a 6 LED strip on the bottom.
My goals for this was:
I looked at several ways to run the LED strip wire and I figured the best way would be in-between the face plate and the switch panel area. I decided to notch out a small, circular area on the bottom of the face plate. By doing this, the wire would be out of sight and allow the face plate to sit flush and not pitch the wire. I used a Dremel to notch out the bottom of the face plate. Next I did a measurement of how much wire I wanted and added a male quick disconnect to the LED strip.
Once that was done, I mounted the LED strip. I used 1 adhesive backed mounting plate with zip tie to secure the wire. I placed the mounting plate on the inside bottom of the face plate. That mounting plate wasn't needed, but my concern was the wire would get caught if I take the face plate off in the future and pull the light out. My hope is the mounting base would prevent that. Once the light was mounted, I did a test fit.
My goals for this was:
- No wires showing
- Have the face plate sit flush after LED installation
I looked at several ways to run the LED strip wire and I figured the best way would be in-between the face plate and the switch panel area. I decided to notch out a small, circular area on the bottom of the face plate. By doing this, the wire would be out of sight and allow the face plate to sit flush and not pitch the wire. I used a Dremel to notch out the bottom of the face plate. Next I did a measurement of how much wire I wanted and added a male quick disconnect to the LED strip.
Once that was done, I mounted the LED strip. I used 1 adhesive backed mounting plate with zip tie to secure the wire. I placed the mounting plate on the inside bottom of the face plate. That mounting plate wasn't needed, but my concern was the wire would get caught if I take the face plate off in the future and pull the light out. My hope is the mounting base would prevent that. Once the light was mounted, I did a test fit.


The last thing to do before making the wire harness was to add quick disconnects to the floorboard LED strips. I left about 5 inches of wire on each of the LED strips. This was very simple and only took a few minutes to do.
Next up was making the wire harness with on/off switch for the center console and floorboard lighting.
My goals for this were:
This harness would have several connection points. I would have an LED strip connecting to each end of the harness, a connection for the LED light extention on the center console, a connection for the light strip which would be mounted on the bottom of the radio face plate and a on/off switch. Again the switch would be located on the top of the steering column. I measured how much wire would be needed on the inside of the vehicle and how much would be need to run through the fire wall into the engine bay. Before making the wire harness, I figured out where all the connection points would be and ran heat shrink down the main wires. From there I connected the wires and soldered them together.
Before installation I decided to do a test. A drill battery was used to power the lights. Once the test was complete, I installed the wire harness, center console and radio face plate.
My goals for this were:
- Not to have a lot of excess wire
- Use quick disconnects for all the lights
This harness would have several connection points. I would have an LED strip connecting to each end of the harness, a connection for the LED light extention on the center console, a connection for the light strip which would be mounted on the bottom of the radio face plate and a on/off switch. Again the switch would be located on the top of the steering column. I measured how much wire would be needed on the inside of the vehicle and how much would be need to run through the fire wall into the engine bay. Before making the wire harness, I figured out where all the connection points would be and ran heat shrink down the main wires. From there I connected the wires and soldered them together.
Before installation I decided to do a test. A drill battery was used to power the lights. Once the test was complete, I installed the wire harness, center console and radio face plate.


Once everything was installed, I measured and cut the power wires for the light harnesses. The lights are connected to a Blue Sea power block which is wired to the battery. The bower block has fuses so there was no need to fuse the wire harnesses. I used a 5 amp fuse for both harnesses, but I might bump down to a smaller amp fuse. After that, the only thing left to do was clean up the wires under the dash.


From start to finish I would say I have about 35-40 hours in this project with an approximate cost about $175.00. Again, this was the first time I have done something like so thats why it took me so long. Also I'm sure I have ADD so shiny things distract me.
I learned a lot from this project. One of the most important things I learned, PAY ATTENTION to what you're doing. There was several times I soldered the wrong wire or forgot to place the heat shrink before doing something or cut a wire to short. Luckily they were all fixable mistakes.
Overall, I think this project was worth the time and money. I am very happy with the way it turned out.
Finished Product


|
|